*NOTE: This is in no way a replica of VSCO. I recommend purchasing VSCO for Lightroom or Camera Raw if you’re able, as they’ve done an amazing job of creating some impressive presets for your photos. This is simply my very affordable way of trying to achieve a similar look using what’s available to me. And I look forward to purchasing VSCO sometime in the near future.*
I felt the need to re-do this tutorial because in the last few months I’ve done quite a lot of experimentation with some of the methods I used. I’ve been growing and developing as a photographer – from using my camera to finding the right way to edit my photos. I’ve FINALLY found the right way to make this work, and I’m 100% satisfied and happy with it! Yay! So here’s the updated tutorial…enjoy!
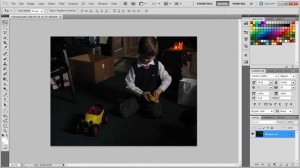
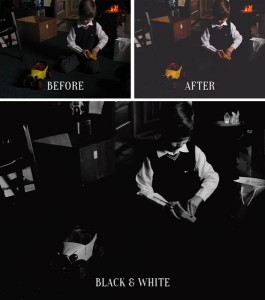
First off, keep in mind that you need to be shooting with an image in your head of what you want your final shot to look like. For this specific style, you’ll need to underexpose your shots. I don’t have a formula for you – but keep in mind that your subject’s skin is the most important thing to get “right” in terms of color and exposure. If you can capture the true color of the skin and make sure you’re not blowing any parts out, then your photo will look perfect when you edit it. (You’ll notice the photo I’m using is pretty substantially under-exposed. I only wanted to capture my little brother – and the highlighted part of his face.)
If you would prefer to use an action instead of doing this yourself, feel free to download my action set here. I’ve included the original action, the updated action, and a black and white action. You are free to use these as long as you do not re-distribute them or claim them as your own. (Photographers, feel free to use them on photos for clients)
1. This is the photo we’ll be using.
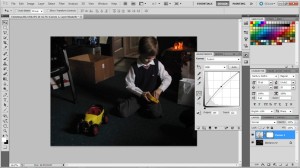
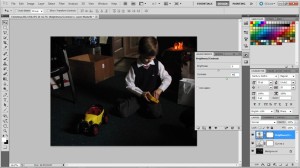
2. First off is lightening the shot just a little bit. I find that I normally need to do this. Click the circular button directly below the center of the layers panel and click curves. Bring the line up until you have a slight curve.
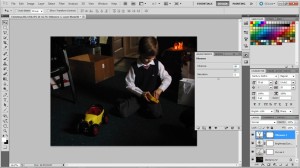
3. My camera does not capture the range of colors or the contrast I wish it would – so here I’ve added a brightness/contrast layer to compensate for some of that. I’ve set the contrast to 40.
4. Next is to add some more color. If you have a dslr (I shoot with a Canon Powershot SX20IS – a high-end point and shoot. I know, I know, sounds like an oxymoron, doesn’t it? ;) ) you may not need to do this, as your camera doubtless captures many more and much better colors than mine. I’ve set the Vibrance layer to 80.
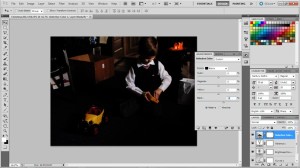
5. One of the most important parts is to edit individual colors. Here are the settings I’ve used in the Selective Colors panel-
Yellow: Magenta +70, Yellow +20
Green: Yellow +50, Black +100
Blue: Black +30
Black: +25
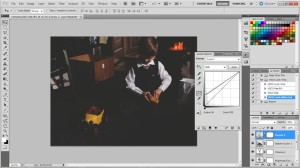
6. Lastly is adding the matte layer that gives your photo that film look. To do this, add a new curves layer and individually adjust the red, green, and blue channels so that each one of them looks like the ones above. (Note that the screenshot is of all R, G, and B channels together) They all need to be as exactly the same as possible. Once you’ve done that, decrease the opacity of the layer to 50%.
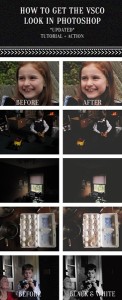
And that’s it! The most important parts of all of this would be the contrast layer, the selective coloring (especially the blacks), and the final curves layer. If you’d like to make a black and white version, just use this same method to edit your photo, save it as a jpeg (or just merge the layers) open it back up, change the mode to grayscale, change the mode again to duotone, and choose Bl for low con CG9 CG2. I love this preset so much – it gives you a just-about-perfect black and white edit without hardly any work!
I hope this tutorial has been helpful! Feel free to ask any questions you might have.


awesome tutorial, hannah — thanks for sharing! ♥
one question, though. i tried testing out the b&w on a photo, and it says “this action cannot be completed because the file could not be found.” think you can help me out? :)
oh i love this! i can’t wait to try it out. thanks for sharing :)
xx | natalia.
You’re welcome, girls! Hope it can be a help to you. =)
Jess – I’m wondering if it’s a photoshop thing…try manually changing the mode to grayscale, then duotone, and choose the Bl for low con CG9 CG2 setting. If it’s there then the action *should* work…
haha photoshop can be ornery sometimes. ;)
Ooo I can’t wait to try this!! Thanks Hannah!
You’re welcome, Emily! =)
Awww. Thats so nice of you!
THANK YOU! Ive been looking forward to this vsco-ish editing!
*Havent try it though. Need to wait my computer to be repaired completely. I need to reformat everything back T__T Still thanks!
You’re welcome, Ulfa! I hope it’ll be useful to you. =)
This is very helpful. Thank you. :)
So glad it is, Monique! You’re welcome. =)
Hello and thank you from Hong Kong. Have been experimenting for some time and couldn’t figure out how to get that raw and matte finish on my photos. :)
I can do the same in photoshop mobile? (android)HELP ME!
i’m having problems with that D:
it isn’t working in my pictures, could you help me pls? i already tried both tutorials :(
i just love this effect <3
Hi Hannah,
thank you for sharing and updating the technique! Really appreciate your generosity.
Tim
Omg a million thanks, this is so helpful! :*****
I’m a big fan of Android.. so, I can’t purchase vsco cam unfotunately..
I’d like to thank you for the helpful tutorial! :)
You’re amazing! Thank you :)
Been looking for something like this for monthsssss! Thank you so much! You just made me life easier.
This is a truly awesome preset. I have used it with some raw files from a 1D X, and the result (usually without even tweaking one thing) is absolutely killer.
Thank you very much!
I actually own VSCO CAM and I must say i’m impressed by what you did here :) I downloaded your action for my photoshop (which is installed on another computer), for when I am too lazy to go from one computer to another (don’t ask). Anyway, thank you!
Have you considered doing this for Lightroom?
Really nice tutorial, but would you have an action for that?
Thank you!
Thanks! Love the tutorial and action!
Very awesome. Thanks so much for sharing this!
I’m doing a happy dance right at this page! You so rock!
xo,
Stephanie Violet
is it possible to make this into a preset for lightroom? I apologize if I’m not making sense, I’m quite new to all of this.
Thank you so much for this!!
leona-photographics.blogspot.com
Check this: http://www.film-effect-photoshop.com , they offer a free sample
thanks hanna for sharing :)
-m
I LOVEEEEEE your actions!!!! They really saved me, THANKS SO MUCH!!
Thank you for the tutorial. It was helpful.
Thank you for the actions. I already started to play with them and had to come back to say a big Thank You!!!!!!
thank you very much, its amazinggggg
Thank you sooo much, I love this.
Brilliant! Thanks a lot :)
I love you for doing this.
thank you thank you thank you so much
Hey there, I really want to go about using this for my PS Elements 10. Can you give me some instruction on how to load them into my Photo Shop?
Thanks so much.
Terima kasih. Hang memang terer.awsome hannah ^_^
Merci beaucoup, je suis une française même si ton tutorial n’était pas en français je l’ai compris ( j’en suis fière ) de plus j’aime beaucoup tu m’as beaucoup aidé. N’empêche tu expliques extrêmement bien. Ton tutorial est clair, précis, compréhensible même pour ceux qui ne sont pas anglais, et joliment illustré. Bisous et je te félicite c’est vraiment parfait ton tutorial. ♥
Wow, thank you so much dear
[…] so much money on VSCO film, I decided to recreate the style in photoshop. Beloved Bluebird and Hannah Rose Beasley both were so kind to blog a VSCO effect tutorial on their respective blogs. I used the tutorial by […]
[…] *NOTE: I HAVE AN UPDATED VERSION OF THIS TUTORIAL THAT IS VISUALLY MUCH CLOSER TO THE VSCO PRESETS. CLICK ON OVER TO VIEW IT.* […]
DreamProxies.com – lowest priced professional private proxies with 50% low cost! Elite quality, Limitless proxies, Excellent speed along with Cheapest prices : simply $0.25 for each proxy! Best non-public proxies simply by DreamProxies.com